I’m not that great of a photographer — I’m lousy at composition, for example, and I’m not all that creative — but I do know a few things. If you’re standing along the route of a bicycle race and want to get that great shot, here are some handy tips for you.
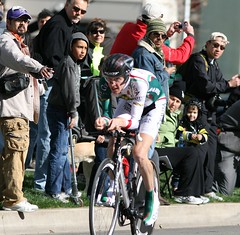
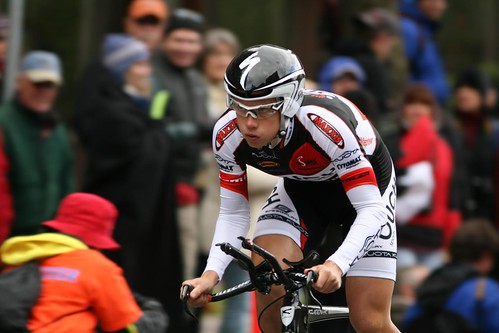
- Get close to the action. People like to see faces, so fill the frame. You can do this with a long (and expensive) telephoto lens, or you can get physically close. Getting physically close is difficult at large races like the Tour of California, even if you have media access. Look at the race route and consider out of the way locations — you’ll miss a lot of drama, but you can get right in the action. Compare these two photos: which do you like better?

- Focus on the face. This isn’t a hard and fast rule, but it’s a good one to keep in mind — keep the focus on the face of the rider if you can. You’ll get a lot more oomph out of your photo if you can clearly seen his eyes.
- Depth of field. The f stop is the ratio of the shutter opening to the size of the lens. Smaller numbers are larger openings: f1 means the shutter opens to the maximum diameter of the lens, while f22 and smaller are pinhole openings. Eliminate background clutter if you can by opening the f-stop of your lens as much as possible to reduce the depth of field. Your subject is in sharp focus while the rest of the frame is out of focus. Small point-and-shoot cameras aren’t capable of this, nor are the kit lens that generally come with SLR cameras.
Because I’m a cheapskate, for me this means renting a good prime (non-zooming) lens. I shot the Tour of California this year with a Canon300mm f4 lens
that I rented for about $80 for a week of use. Most of my SLR photography is with a very inexpensive but good Canon 50mm f1.8 lens
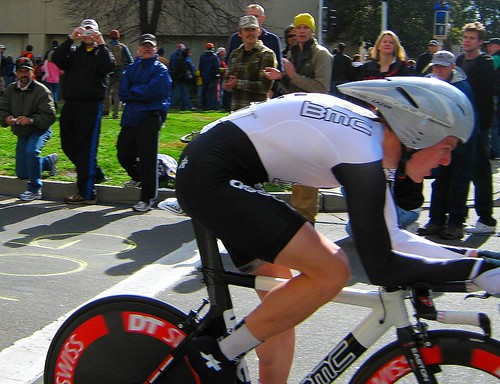
. Look below to see what I mean about depth of field.
Shot with 300mm at f4. Note the nicely blurred background. This is an example of a shot taken immediately after a u-turn in an individual time trial, so the cyclist is putting out his maximum effort. I try to put the AF point right on the cyclist’s nose so we can clearly see his eyes.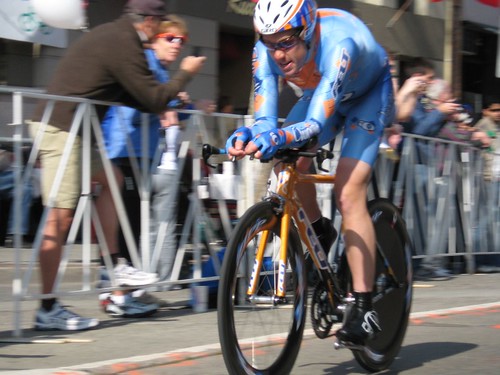
Shot with a point-and-shoot camera at f5.5. There’s still blurring of the background but that’s because of panning (motion blur), not depth of field. This photo was taken with I consider the best P&S camera I’ve tried: the Canon PowerShot A570 - Avoid downhills and straightaways. If you’re on the downhill side of a hill, the cyclists will zip by so fast you’ll just get a blur if you’re lucky enough to catch anything. The same is true on the straightaways of fast time trials.
Stage races have neutral starts where the cyclists all move at a casual pace. There’s not a lot of excitement during the neutral start but they’re safe, easy shots to get. It’s also a lot easier to identify the cyclists since they’re not battling for position — you can even look at the start list and see their relative position in the peloton to help you out.
Good spots to camp out for drama: Behind the finish, along steep uphills, and after any turning point. At turns, the cyclists have slowed to enter the turn and are often out of the saddle to get back up to speed after the turn.
- Know your autofocus and sensor lag. You’ll need to experiment to learn how well your camera autofocus works. Many point-and-shoot (P&S) camera AF don’t work well with fast moving action. For my Canon XTi, I manually select the AF sensor to use — I can do this very quickly without looking at the buttons.
Many P&S cameras combine poor AF with long shutter lag — shutter lag is the time it takes between you pushing the button and image capture to take place. Generally, you want to stand to the side of the action and pan as the cyclist moves across the center of action. This is something that takes practice as you learn to time your photos with the shutter lag. Here’s a photo my daughter (age 9) took using this technique on a P&S with a 1.5 second lag — if she can do it, so can you. Composition suffers, but she got the cyclist in the frame. Notice also that the background has about the same focus as the subject because of the deep depth of field.
- Freeze the action. Some photographers do a good job showing action through blurring, but it’s hard to make this look good. You have a few ways to freeze the action effectively for a given shutter speed.
Panning means moving the camera side to side as you follow the action. The background will be blurred (giving a good indication of movement) but the subject should be crisp. You do this by following the subject through your viewfinder then smoothly pressing the shutter release. You want to lead the cyclist — that means you want to compose the frame so it appears as if the cyclist is entering the photo; unfortunately for P&S cameras this is often impossible because the AF sensor is in the middle of the frame. On DSLRs where you can select the AF sensor, choose the left sensor if the cyclist is coming from the left; choose the right sensor if the cyclist comes from the right. Panning is essential for shooting during criteriums or in track racing.
Get in front of the action to decrease the apparent motion. This means parking yourself at a turn or at the finish line. Remember, get their faces! Aim right at the cyclist and shoot away.
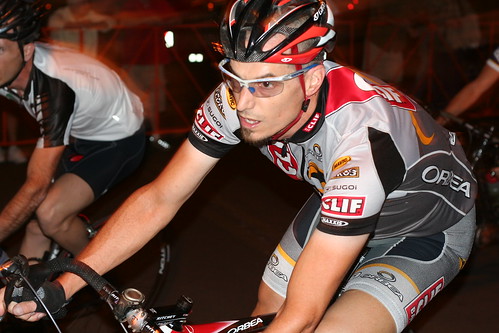
Flash has limited application in cycling but can be important in night racing or shooting in dark conditions. Several photographers shot with flash during the 2009 Tour of California in Santa Cruz County as the cyclists ascended through heavy and dark redwood forests in heavy rain. The below is a photo I shot during a night time criterium in Las Vegas. I’m not a flash guru, so you’ll see how in my case it flattens the subject and casts a harsh light. You can get fancy with softboxes, bounces and flash brackets, but I’m likely to break anything that juts out of my camera.
- Composition is where I have a big weakness. Here are some general tips, though:
– Stay low to the ground. The cyclists are crouched down over their handlebars, and you can see their faces better if you’re pointing up at them. This is obviously impossible if you’re stuck three people back in a big crowd (find somebody short to shoot over), so arrive early or find an out of the way location.
– Vertical or horizontal. I have a bad habit of focusing on the face so much that I chop out the bike. Go vertical on those individual shots if the cyclist is coming at you. Go horizontal for the arriving peloton coming over a hill or when you shoot from the side. Vertical for individual raising his arms on the podium, horizontal for all three riders on the podium. Pretty basic, I know, but I screw this one up all the time.
– The “Rule of Thirds” is a basic composition rule that says to divide a frame into thirds vertically and horizontally and put the subject where those lines intersect. For cycling, this means leaving some space in front of the cyclist to show that he’s going somewhere. I often break this rule so my photos look a little “off” to most people (including myself). The photo at the very top of this article, for example, breaks this rule pretty badly. I was trying to focus on the rain splashing behind the cyclist but the result is something that’s a little bit ‘meh.’ Do as I say, not as I do 🙂
- Finally, STAY OUT OF THE WAY! I see some pretty stupid stuff on the race course with photographers getting right in the path of cyclists. During Stage 2 of the 2009 Tour of California, Lance Armstrong’s personal photographer Liz Kreutz got too close to Armstrong, got bumped and caused a big pileup with bikes and cameras flying everywhere. She sent one rider to the hospital, broke two very expensive cameras and tacoed several wheels. This was actually probably the moto foto driver’s fault, but it still illustrates what can happen when you get in the way of a thundering heard of cyclists traveling at 30 mph or more.
Also, as a matter of courtesy, stay down if there are photographers behind you.
I know many photographers follow Cyclelicious. What are your cycling photography tips?
You forgot to mention…pray for a sunny day. Nothing sucks more than washed out shots from an overcast/cloudy/foggy day.
You forgot to mention…pray for a sunny day. Nothing sucks more than washed out shots from an overcast/cloudy/foggy day.
Fritz, I think you covered the bases very well!
While sunny weather is nice, you can get some great photos in cloudy situations. The color saturation can be fantastic, not to get some good close-up photos of cyclists struggling. With a little work in Photoshop, you can make some of those photos pop!
Fritz, I think you covered the bases very well!While sunny weather is nice, you can get some great photos in cloudy situations. The color saturation can be fantastic, not to get some good close-up photos of cyclists struggling. With a little work in Photoshop, you can make some of those photos pop!
Actually, of the ones above, I like the one that shows the crowd.
Frankly, up close cycling shots are a dime a dozen. Unless the rider is making an unusual face, or something else unique is going on in the photo, its just not that special. But when you see the crowds cheering, or some landmark building or terrain in the background, or even several riders so you can get a snapshot of race dynamics at that moment, then I think you have a far more interesting pic.
Fun primer! And I'd love to hear how the lens worked out for you.
Actually, of the ones above, I like the one that shows the crowd.Frankly, up close cycling shots are a dime a dozen. Unless the rider is making an unusual face, or something else unique is going on in the photo, its just not that special. But when you see the crowds cheering, or some landmark building or terrain in the background, or even several riders so you can get a snapshot of race dynamics at that moment, then I think you have a far more interesting pic.Fun primer! And I'd love to hear how the lens worked out for you.
I'm flattered you read this, Sabine!
I'm not at all creative, so dime a dozen is what I'm best at 😉
Thank you also, Roger and Michael. Of course, we don't have much control over the weather.
I'm flattered you read this, Sabine!I'm not at all creative, so dime a dozen is what I'm best at 😉 Thank you also, Roger and Michael. Of course, we don't have much control over the weather.
I'm going to have to go with Sabine here. A face isn't worth much unless you can tell what it's doing and unless you have good equipment, it's actual closer to shoot a face up close than the entire rider due to depth-of-field concerns. The issue with the 'bad' photo isn't that it's further away, it's mostly just composition. Also, downhills and straightaways are great if your camera can handle it, though in those situations you generally want to frame the action head- or side-on.
I'm going to have to go with Sabine here. A face isn't worth much unless you can tell what it's doing and unless you have good equipment, it's actual closer to shoot a face up close than the entire rider due to depth-of-field concerns. The issue with the 'bad' photo isn't that it's further away, it's mostly just composition. Also, downhills and straightaways are great if your camera can handle it, though in those situations you generally want to frame the action head- or side-on.
@Michael: actually, cloudy days can be wonderful because the lighting is very soft. I'd take a cloudy day over noon sun anyday. You can get very nice dramatic shots, assuming that it's not too dark and your camera isn't drenched in water
@Michael: actually, cloudy days can be wonderful because the lighting is very soft. I'd take a cloudy day over noon sun anyday. You can get very nice dramatic shots, assuming that it's not too dark and your camera isn't drenched in water
Great tips and ideas. For my own part, I like to position myself at the top of a hill. For Stage 2, I found a good long straight away just after a decent climb and got some great shots. I'd set up "shop" in the back hatch of my Escape to stay out of the rain.
I think the rain enhances the drama of the whole event though. These guys were still rolling with serious speed despite much more unforgiving conditions. And water almost always adds a great organic element to photos.
Here are the ones I've published to Flickr so far along with a stitched video featuring some totally unscripted comments from my 4 1/2 year old son about how awesome it was.
Great tips and ideas. For my own part, I like to position myself at the top of a hill. For Stage 2, I found a good long straight away just after a decent climb and got some great shots. I'd set up "shop" in the back hatch of my Escape to stay out of the rain.I think the rain enhances the drama of the whole event though. These guys were still rolling with serious speed despite much more unforgiving conditions. And water almost always adds a great organic element to photos.Here are the ones I've published to Flickr so far along with a stitched video featuring some totally unscripted comments from my 4 1/2 year old son about how awesome it was.
Here are some other tips on bicycle race photography.
It not so much focusing on the face as getting rid of distracting backgrounds and emphasizing the subject. So with that in mind:
1.) Try shooting at aperture priority and with the lens at the widest aperture or one or two stops down with a telephoto to help get rid of distracting backgrounds.
2.) Watch your backgrounds! most amateur snaps are just that because of distracting and/or crappy backgrounds that only detract from the main subject.
3.) Forget about stopping motion. This is completely boring, slow down your shutter, at least enough to get wheels spinning (experiment!).
4.) Shoot in manual mode. Digital cameras are wonderful for making perfect (averaged) exposures. As a result, with today's dSLRs a monkey can make perfect exposures. Try something else: shoot in manual mode (if your camera has this) and check your results as you go, you'll find out how exposure works when varied slightly, and get more dramatic pictures you never thought of and be a better photographer as result.
5.) in bright daylight, use a polarizer
6.) Photographing cycling is basically fish in a barrel. With Cycling movement is predictable, unlike sports like soccer where movement can be erratic. You can lock your AF on a spot and shoot when the rider enters that spot. Another alternative is to keep flicking your finger on the shutter button halfway when riders are coming at you and start shooting when they fill the frame.
7. use a fill flash for back-lit scenes or crappy weather. Use rear sync setting on your shutter, to release the flash at the end of the exposure so a blurred trail happens behind the subject.
8.) FILL THE FRAME. again, most amateur snaps are just that because the photographer wasn't close enough or had too many distracting elements in the background.
Happy shooting.
Here are some other tips on bicycle race photography.It not so much focusing on the face as getting rid of distracting backgrounds and emphasizing the subject. So with that in mind:1.) Try shooting at aperture priority and with the lens at the widest aperture or one or two stops down with a telephoto to help get rid of distracting backgrounds. 2.) Watch your backgrounds! most amateur snaps are just that because of distracting and/or crappy backgrounds that only detract from the main subject.3.) Forget about stopping motion. This is completely boring, slow down your shutter, at least enough to get wheels spinning (experiment!).4.) Shoot in manual mode. Digital cameras are wonderful for making perfect (averaged) exposures. As a result, with today's dSLRs a monkey can make perfect exposures. Try something else: shoot in manual mode (if your camera has this) and check your results as you go, you'll find out how exposure works when varied slightly, and get more dramatic pictures you never thought of and be a better photographer as result.5.) in bright daylight, use a polarizer6.) Photographing cycling is basically fish in a barrel. With Cycling movement is predictable, unlike sports like soccer where movement can be erratic. You can lock your AF on a spot and shoot when the rider enters that spot. Another alternative is to keep flicking your finger on the shutter button halfway when riders are coming at you and start shooting when they fill the frame.7. use a fill flash for back-lit scenes or crappy weather. Use rear sync setting on your shutter, to release the flash at the end of the exposure so a blurred trail happens behind the subject.8.) FILL THE FRAME. again, most amateur snaps are just that because the photographer wasn't close enough or had too many distracting elements in the background.Happy shooting.
Thanks for sharing all your tips. Good stuff and also helpful for street photographers who are trying to capture a stylishly dressed bicyclist in motion.
Thanks for sharing all your tips. Good stuff and also helpful for street photographers who are trying to capture a stylishly dressed bicyclist in motion.